
How to Build an Awesome Blog Post Template Using DropFunnels

by Martin Hurley | Quick read
Ready to set up an awesome blog post template with DropFunnels?
After many moons of trial and effort, I've finally got a handle on it! So, on this page, we'll explore in depth how to set up your new blog post layout...
With a simplicity that I'm sure you'll appreciate!
Full transparency. I'm an affiliate for DropFunnels. :)
If you've no idea what I'm waffling on about, and you currently don't use DropFunnels, then feel free to take a peek at this review of DropFunnels.
Keep in mind that I wrote this based around setting up a simple, fast loading blog post template using the nifty DropFunnels software tool.
But anyhoo...
Let's harp back to the beginning...
How to set up your blog post template
When you log into DropFunnels, the first thing you see is the dashboard.
The dashboard (or back office), is the overall "command centre" for your entire authority website / blog.
At some stage, you're going to want to write a blog post.
Well, this page should be able to help you do just that.
I've simplified things down as much as possible.
I've got rid of as much dry wood as I could. Raked all the grass.
One of the most important things you can do is to familiarise yourself with how DropFunnels works.
I mean, it is WordPress, but it's not WordPress as we currently know it!
While in your DropFunnels back office, you've probably seen the left side menu.
Yep. There's a lot of "eye candy" to play with!
You've likely cast your eyes over the POSTS and PAGES.
Seen the little Dashboard > Posts > Add New buttons too.
Well, once you're ready to create a new blog post you have two choices...
A) Use the Text Editor
B) Use the DropFunnels Editor
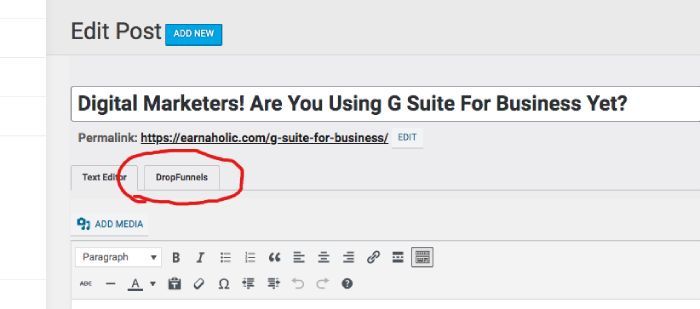
Here's what we're talking about (circled in red below)...
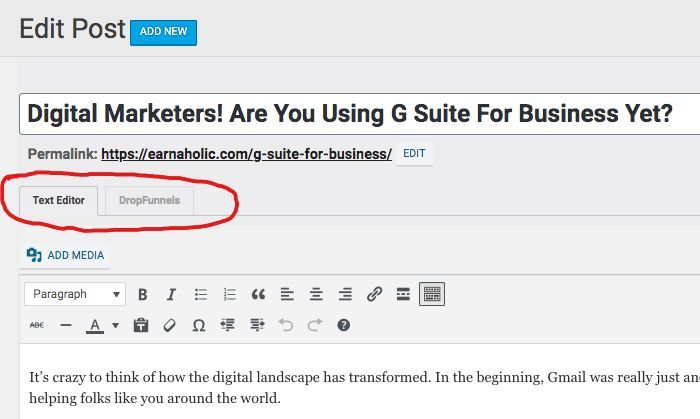
Above image - DropFunnels editor or WordPress text editor
I have always used the default Text Editor.
It sits on the left side, as you can see in the image.
Seemed to be the EASIEST way to create blog posts (so I thought!)
I mean, to create a blog post, all you need to do is...
- Punch in your content
- Add tags etc
- Add search engine optimisation (SEO) details
- Add the essential post details
Then hit the magic publish button!
Too easy.
So why would anyone want to start horsing around with the DropFunnels editor and all its tweak-able boxes?
You know what I mean, right?
Like, spanners?
Little tools that make everything bend?
Who's got time for that! 🙂
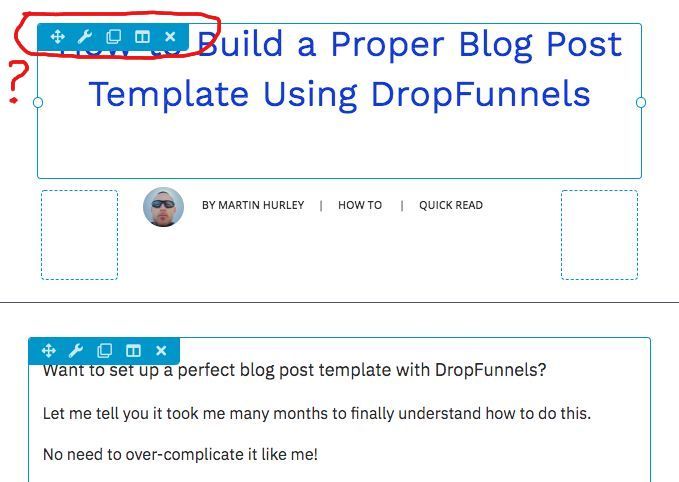
Above image - the DropFunnels post editor
Drag a corner and watch as your page self-destructs!
If you're like me, you lie awake thinking about things like...
How wide should my post content be?
Or maybe...
- Where do my post images live?
- What do all the weird tools mean?
- Where do my H1 or h2 tags go?
Crazy eh?
Anyways...
After soaking in the DropFunnels help videos a gazillion times I kind of got it.
The good news is you can do it the right way by following the simple DropFunnels blog post template tutorial on this page...
Let's get started
After analysing this stuff to death I got down to some testing.
I selected a specific DropFunnels blog template (I'll show you below).
Then I stripped that template right down.
And - well, it kind of works!
Let's go...
1. Select the full width template
Let's begin at the start.
Dashboard > Posts > Add New.
You first need to fill in all the details of your blog post.
No need to add in your post content yet as we will do that later.
Right now, you can add in things like:
- Search Engine Optimisation (SEO) details (keywords etc)
- The TAGS you need
- A featured image that you have prepared.
- The categories for your post
- Title, Meta Description, post keyword etc
- A short keyword based permalink
- Page Title etc
You can edit this anytime and come back to it later if need be.
If this part is a challenge, reach out and I'll point you to some great free help.
After you've done all that make sure to select FULL WIDTH under template.
Right side of your dashboard. Under TAGS, you'll see POST ATTRIBUTES:
Choose TEMPLATE > FULL WIDTH:
Like this...

Above image - select full width template
Great!
Now let's move forward...
2. Using the DropFunnels editor
Now we're going to click the DropFunnels editor.
It's in the red semi-circle below.
Like the image below...
Above image - select the DropFunnels editor
Now the CRAZY stuff happens!
Are you ready?
It's all experimental from here on.
A quick aside: hit SAVE often. Especially when you have a lot of content on your post or page.
VOILA!
Let's go...
Above image - Template > Blog Pages selection
Once you've hit that DropFunnels editor it'll percolate for a few moments then spring into life.
You'll see a blank page (as long as you haven't entered content into it!)
Look to the top right of the page.
See that little + sign?
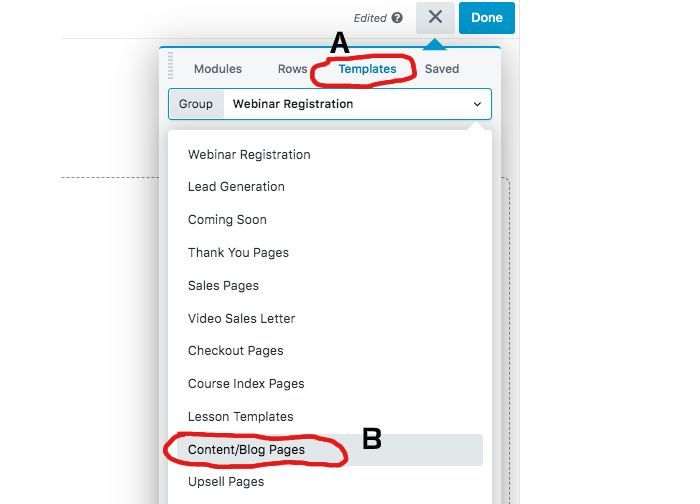
Click that and you'll see a whole bunch of random modules.
Slide over and click Templates (A).
Scroll down to Content / Blog Pages (B)
Good job.
Let's keep going...
3. Choose your blog template
Now we're going to get a blog post layout happening...
After you clicked on Content / Blog Pages you'll see these templates...
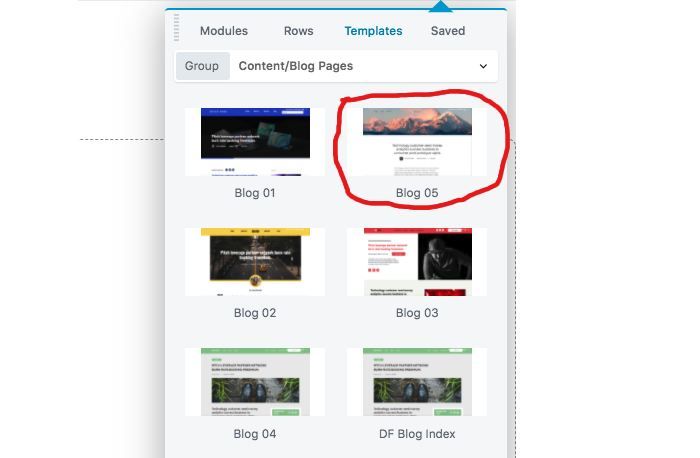
Above image - DropFunnels blog template
I like to use Blog 05.
But you can experiment to your heart's content!
All of those blog templates are somewhat different.
We'll be using the Blog 05 template for the example on this page.
Still with me?
Next please...
4. The complete blog post template
Once you've clicked on Blog 05 it'll percolate and bubble and hiss.
In a few long seconds you (should) see something like this...
Yep, I've squeezed it in a bit to fit...
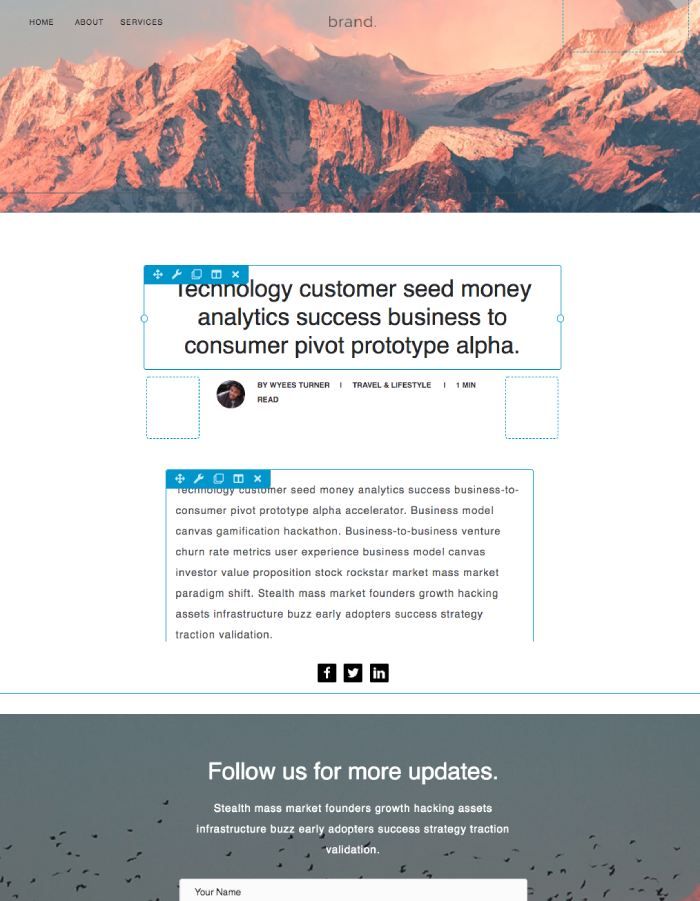
Above image - complete DropFunnels blog post template
This is the basis of your new blog template.
Like, WELL DONE!
It's kind of simple.
And kind of not simple.
What we're going to do is REFINE this blog post template so it FITS our needs.
Here's the parts I like to keep:
- The header element
- The h1 title tag element (A)
- The author details (B)
- The main text editor element (C)
- The social icons
- Some of the footer details if you want
- Header details (if you haven't got a header set up yet)
As you can see there's quite a lot of moving parts.
We will be deleting the parts we don't need.
And keeping the important bits.
5. Keep the important bits
I'm sure there's a technical term for "important bits" but right now that'll do.
The image below shows the 3 main pieces I use for this page you're on right now.
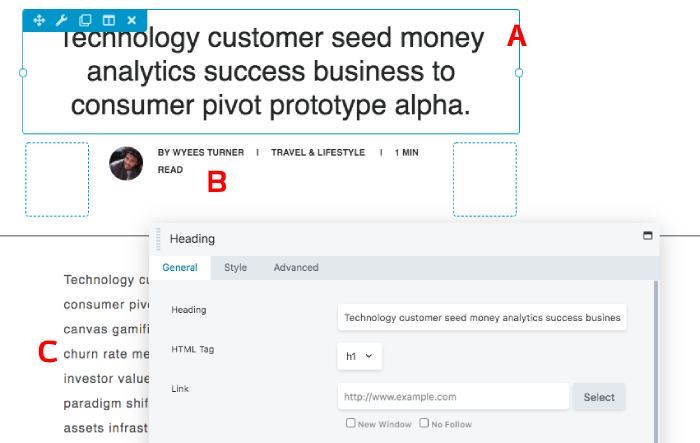
Above image - the DropFunnels Text Editor
You can play around with any element that takes your fancy.
Just remember to save regularly.
Add your blog post title into the (A) above.
That's your h1 title tag.
That's important.
It sets the agenda for your whole post.
You can also edit your author details (B).
You just click on the author box and a text editor pops up.
Try it.
The Text editor below that is (C) where we'll be writing ALL our content.
6. Delete any unnecessary elements
I'm pretty sure you're getting how this all works now.
Unless you need really WIDE images then delete the image below too.
To delete the element just hit the X.
I circled it in the image below...
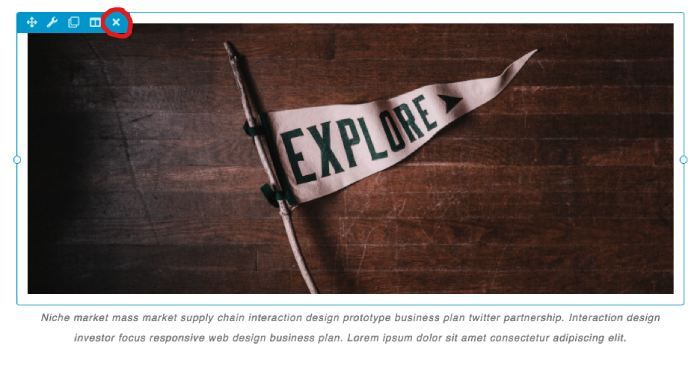 Above image - remove images if needed
Anything you don't need on this blog template you can remove.
You can always add it back later.
I'm all for experimenting. 🙂
7. The DropFunnels blog header
We eliminate the unnecessary so you just have a simple blog post template.
We're going to add images and everything else inside the text editor. (I'll show you how below).
Smash that save button.
Now let's quickly do the blog post header...
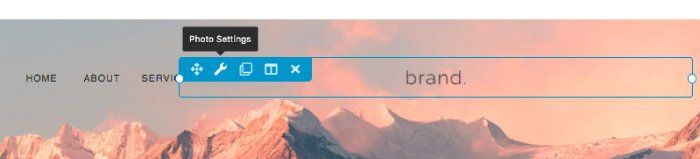
Above image - DropFunnels header element
If you haven't already got a blog header then you can use the header (above) that came with this Blog 05 template.
Just click on brand as you can see above.
It'll open in photo settings.
This is pretty intuitive.
I mean, it's not intuitive like a self driving Tesla, but it's still pretty good.
You can click on HOME, ABOUT (etc) too.
You should be able to see how to edit them.
Or remove if not relevant.
What else do we need to do?
8. Inside your post Text Editor
Now for the fun part.
This is probably the scariest bit.
Or maybe not.
Anyhoo...
Remember how in 5. we explored the main text editor element (C) ?
Anyways, it's the first main text block directly below the author details.
Can you see it?
When you click on that it brings up the Text Editor.
I know it's weird but I create 99% of ALL my content inside that editor.
It looks a bit like this (yours will be less weird!)...

Above image - DropFunnels text editor
Don't worry. That weirdo is not inside your text editor!
And yeah. You can do almost everything inside this text editor.
Groovy eh?
As you can see from above image I can formulate the h2 title in there.
Or I can do a h3 title.
You can also...
- Add your images (i go with about 700 PX wide)
- Add bullet points (like I'm doing now)
- Add call outs (paragraph button > Preformatted) (red arrow above)
- Heaps of other stuff too
You can even add fun little divider lines like this...
See how I did that?
Magic eh?
9. How does it actually look?
This is how it ("should") look.
Take a peek at the image below...
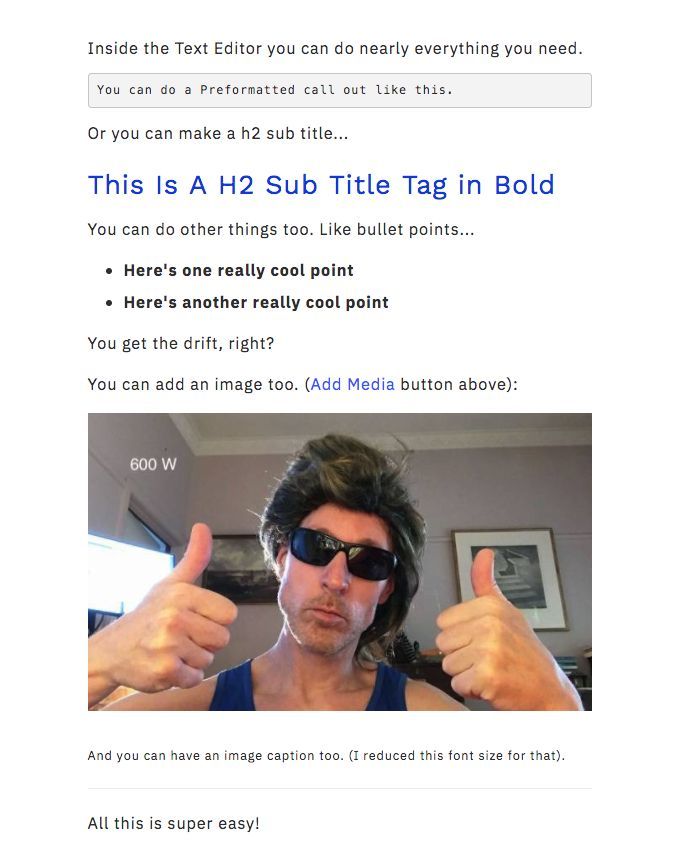
Above image - DropFunnels text editor
Groovy eh?
And we did ALL that within the Text Editor.
You can add a few thousand words in there, like I've done with this page you're on now.
NB: You need to make sure you have set up global settings for your blog.
In particular, the global settings for your FONT tags.
Like your h1, h2, h3 tags (etc).
Just copy my settings if you need (see below).
10. The DropFunnels Global settings
A good tool to use if you are running Chrome browser is WhatFont.
It allows you to discover what fonts people are using.
Only if you're into that sort of stuff though. 🙂
So when you go to a cool website (like mine) you can quickly check what fonts they are using.
Instead of spending the next 3 years trying to guess the best WordPress page builder font.
I'll save you the time.
Here goes...
Dashboard > Appearance > Global settings:
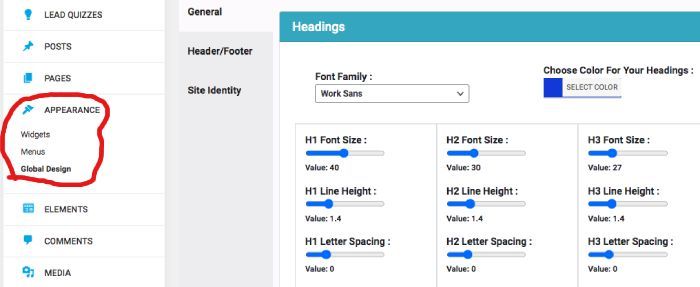
Above image - DropFunnels global settings
The rough red marker marks the spot.
Here's what fonts I use:
- For all headings > Work Sans. (Love it!)
- For body fonts > IBM Plex Sans 18 PT
- Notice I have some specific settings applied
And specific font heading colours too.
Believe me when I tell you I did DEEP TECH research to find those colours!
But anyhoo, where we at?
11. Your DropFunnels content
A couple of little things to do now...
- Footer elements (unless you already have it)
- Social icons
- Add your content
- An evening bicycle ride
Nearly done!
Of course probably the main thing is your content.
I mean, your content (the words you write) is a HUGE factor on whether your page ranks well in Google or not.
Plus it always helps to know a bit about search engine optimisation (SEO).
One way is to use Neil Patel's UberSuggest.
That's how you can get your SEO keyword research done.
As for your actual writing...
- Write it down without editing (ie mistakes and all)
- Give it some days to percolate & come back to it fresh
- Make it easy to "scan"
You know most of this anyway I'm sure.
12. Additional blog post layout settings
Are we there yet?
Oh yeah. The footer element!
Take a peek at this image...
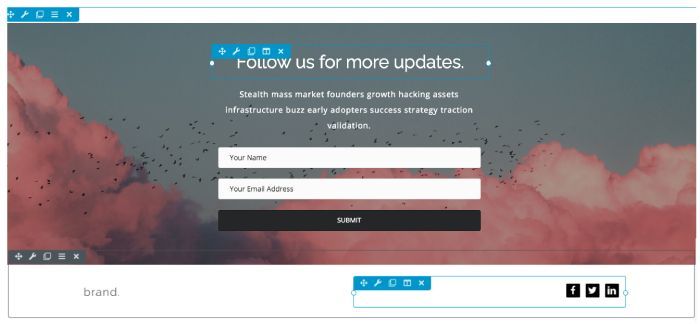
Above image - DropFunnels footer element
Above image is the footer area in the blog post layout we used.
Remove if not needed.
Or you might want to set up the OPT IN email details.
That way you can build your list!
I always recommend Active Campaign as I use them myself.
And I'm sure you know by now, it's all click to edit.
Also click to edit your social media icons.
It's really straightforward so we don't need to step it out, do we?
You can use Konker to get your LOGO done.
A well designed logo puts a smile on your dial!
What else do we need to do?
13. Search engine optimisation (SEO)
Like I mentioned, Neil Patel is the king of SEO.
His YouTube videos are free and excellent.
Sometimes he even talks to me too.
And oh yeah...
Aim to get all GREEN lights in your DropFunnels analysis meter...
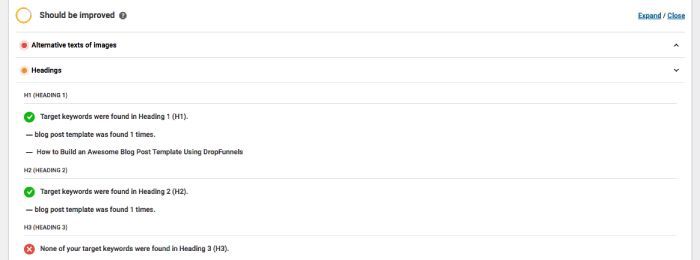
Above image - the DropFunnels SEO editor
You'll see this when you're beginning to edit your blog post (before you click the DropFunnels editor button).
It's almost impossible to get all greens.
However I'm sure you can do it.
Anyways...
14. Final Words
'k so...
There's probably a few bits and bobs I missed.
However the bulk is there to get you started.
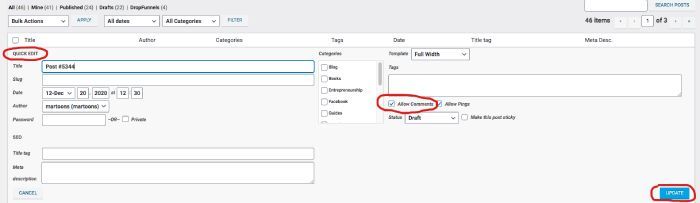
Above image - DropFunnels Quick Edit
Oh yeah.
In your POSTS page you'll see this Quick Edit.
It sits below your blog post name.
When you click on Quick Edit you can add in any details you need.
You can also turn off blog post comments if you need.
Remember to hit update after you've done that.
I think we're done now.
That bicycle ride beckons!
🙂
What's your DropFunnels blog post template going to look like?


Copyright (c) 2023 Earnaholic.com All Rights Reserved